Futuresteading
Know How
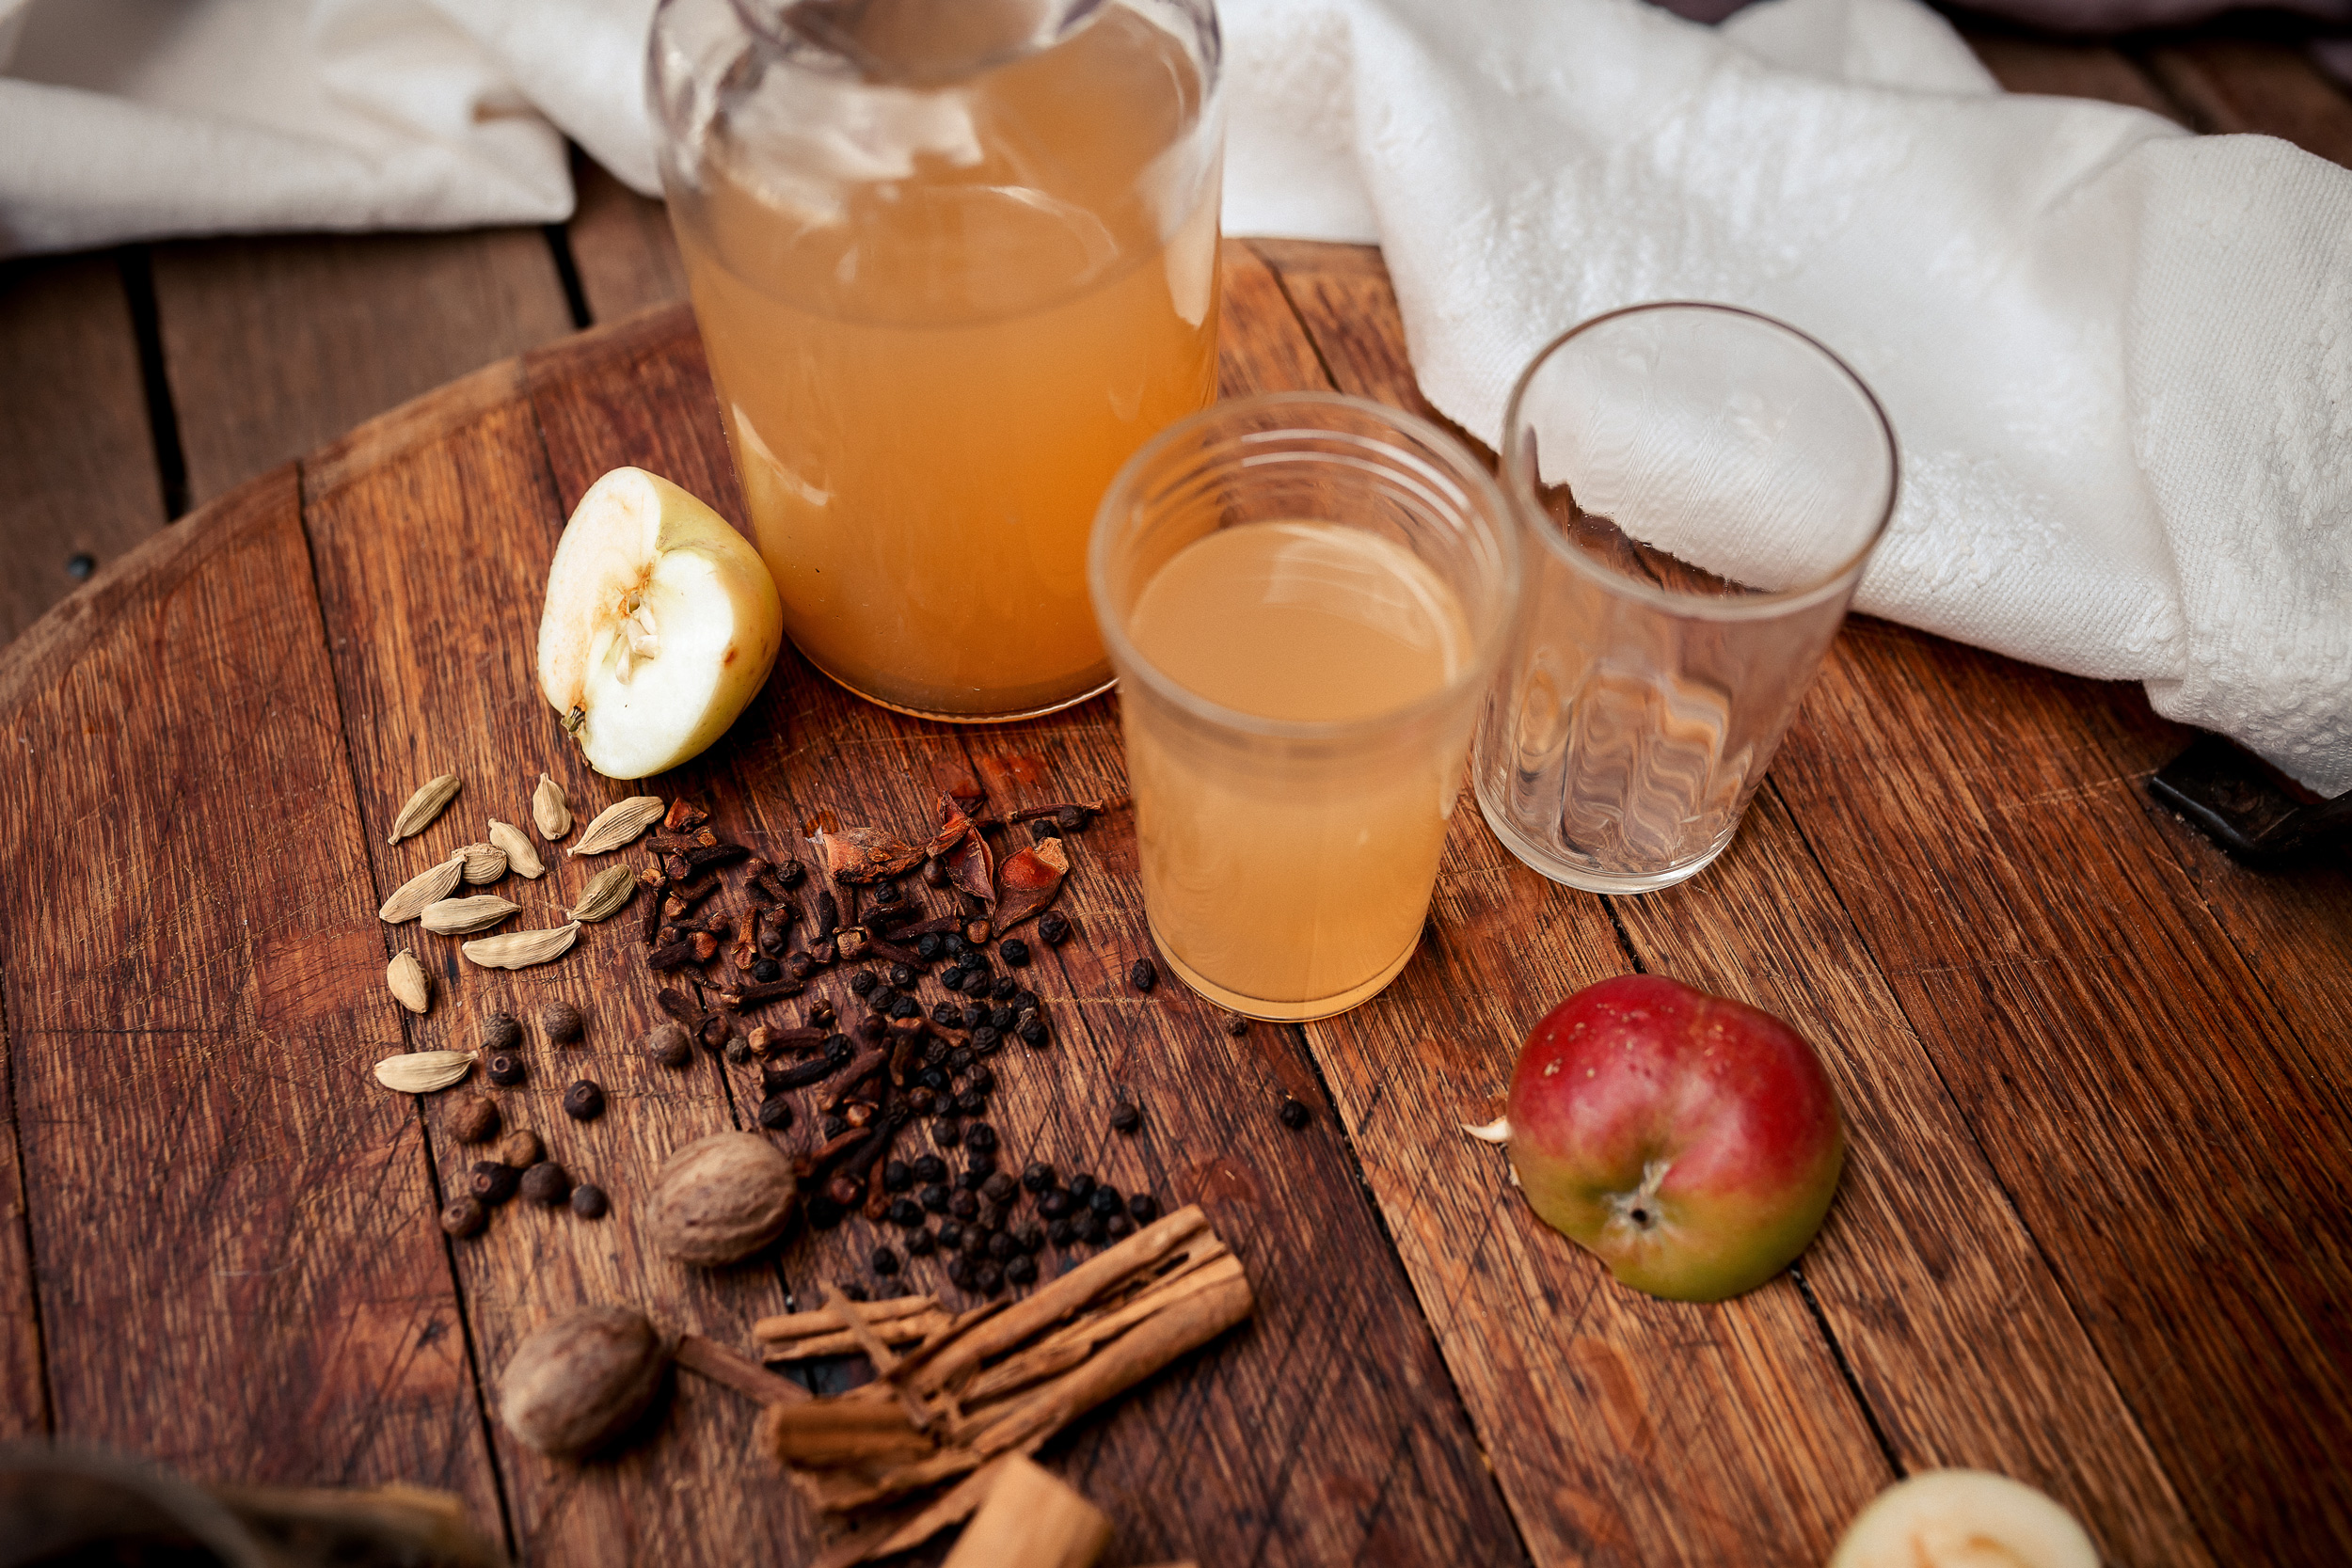
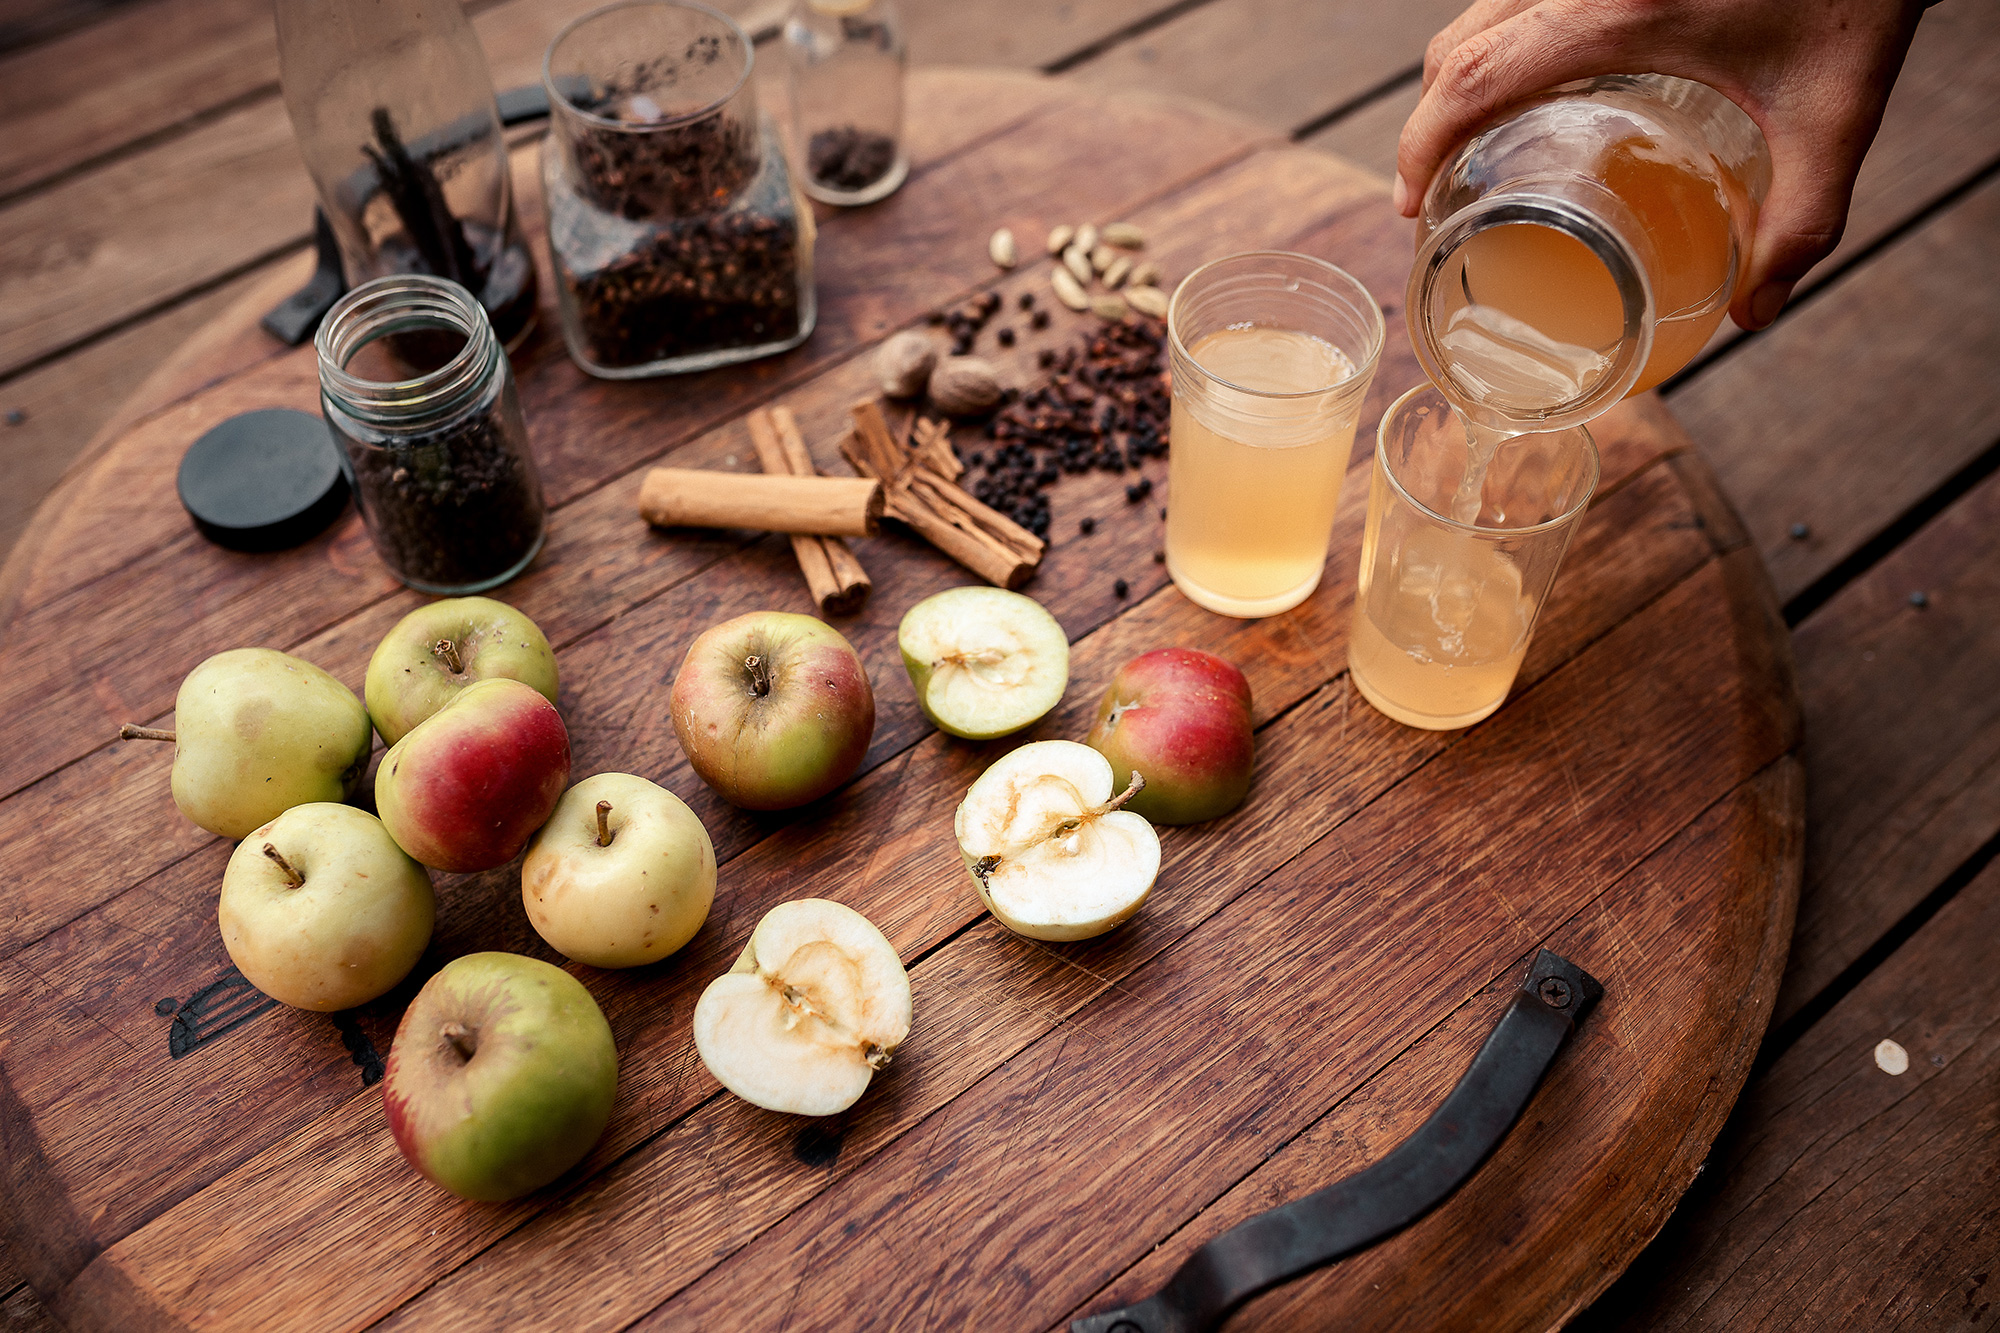
FEAST: Warm Apple Cider
Each year we run a whole series of workshops and gatherings at the farm. The guests who arrive during Autumn are almost always treated to a warm spiced apple cider. It’s not hard to make and for anyone with an apple tree in their yard (or down the road) it’s the perfect way to use the apples which are bumped, bruised and bird eaten. Rather than throwing them to the chooks, although they love them, turn them into juice and then spiced soft cider.
It warms you from your toes up! It feels decadent, despite it being the drink of common villagers since villages began. It’s soft so kids can devour it, and will, and it makes you feel like there’s something to celebrate.
The recipe can be adapted to suit your taste but here’s the one we use as a starting point. It’s as simple as mixing it all together in a big pot and letting it simmer for at least 1.5 hours. Makes 2 litres.
- 2 litres freshly pressed apple juice (we prefer it a bit ‘fluffy so we don’t strain it at all. This means it has ‘bits’ in it. If you prefer smooth drinking then you’ll need to strain it at the end. Another approach is to place all your spices into a small muslin ball that’s knotted together tightly during the simmering process and removed before you serve it.
- 2 whole rolls of cinnamon
- 2tsp ground black pepper
- 20 whole cloves
- 1 whole orange sliced
- 1tsp allspice
- 1tsp nutmeg
Holds a glug of your favourite rum or whisky like a pro if you fancy making a hard version.
CREATE: Seed Saving Library
Introduction
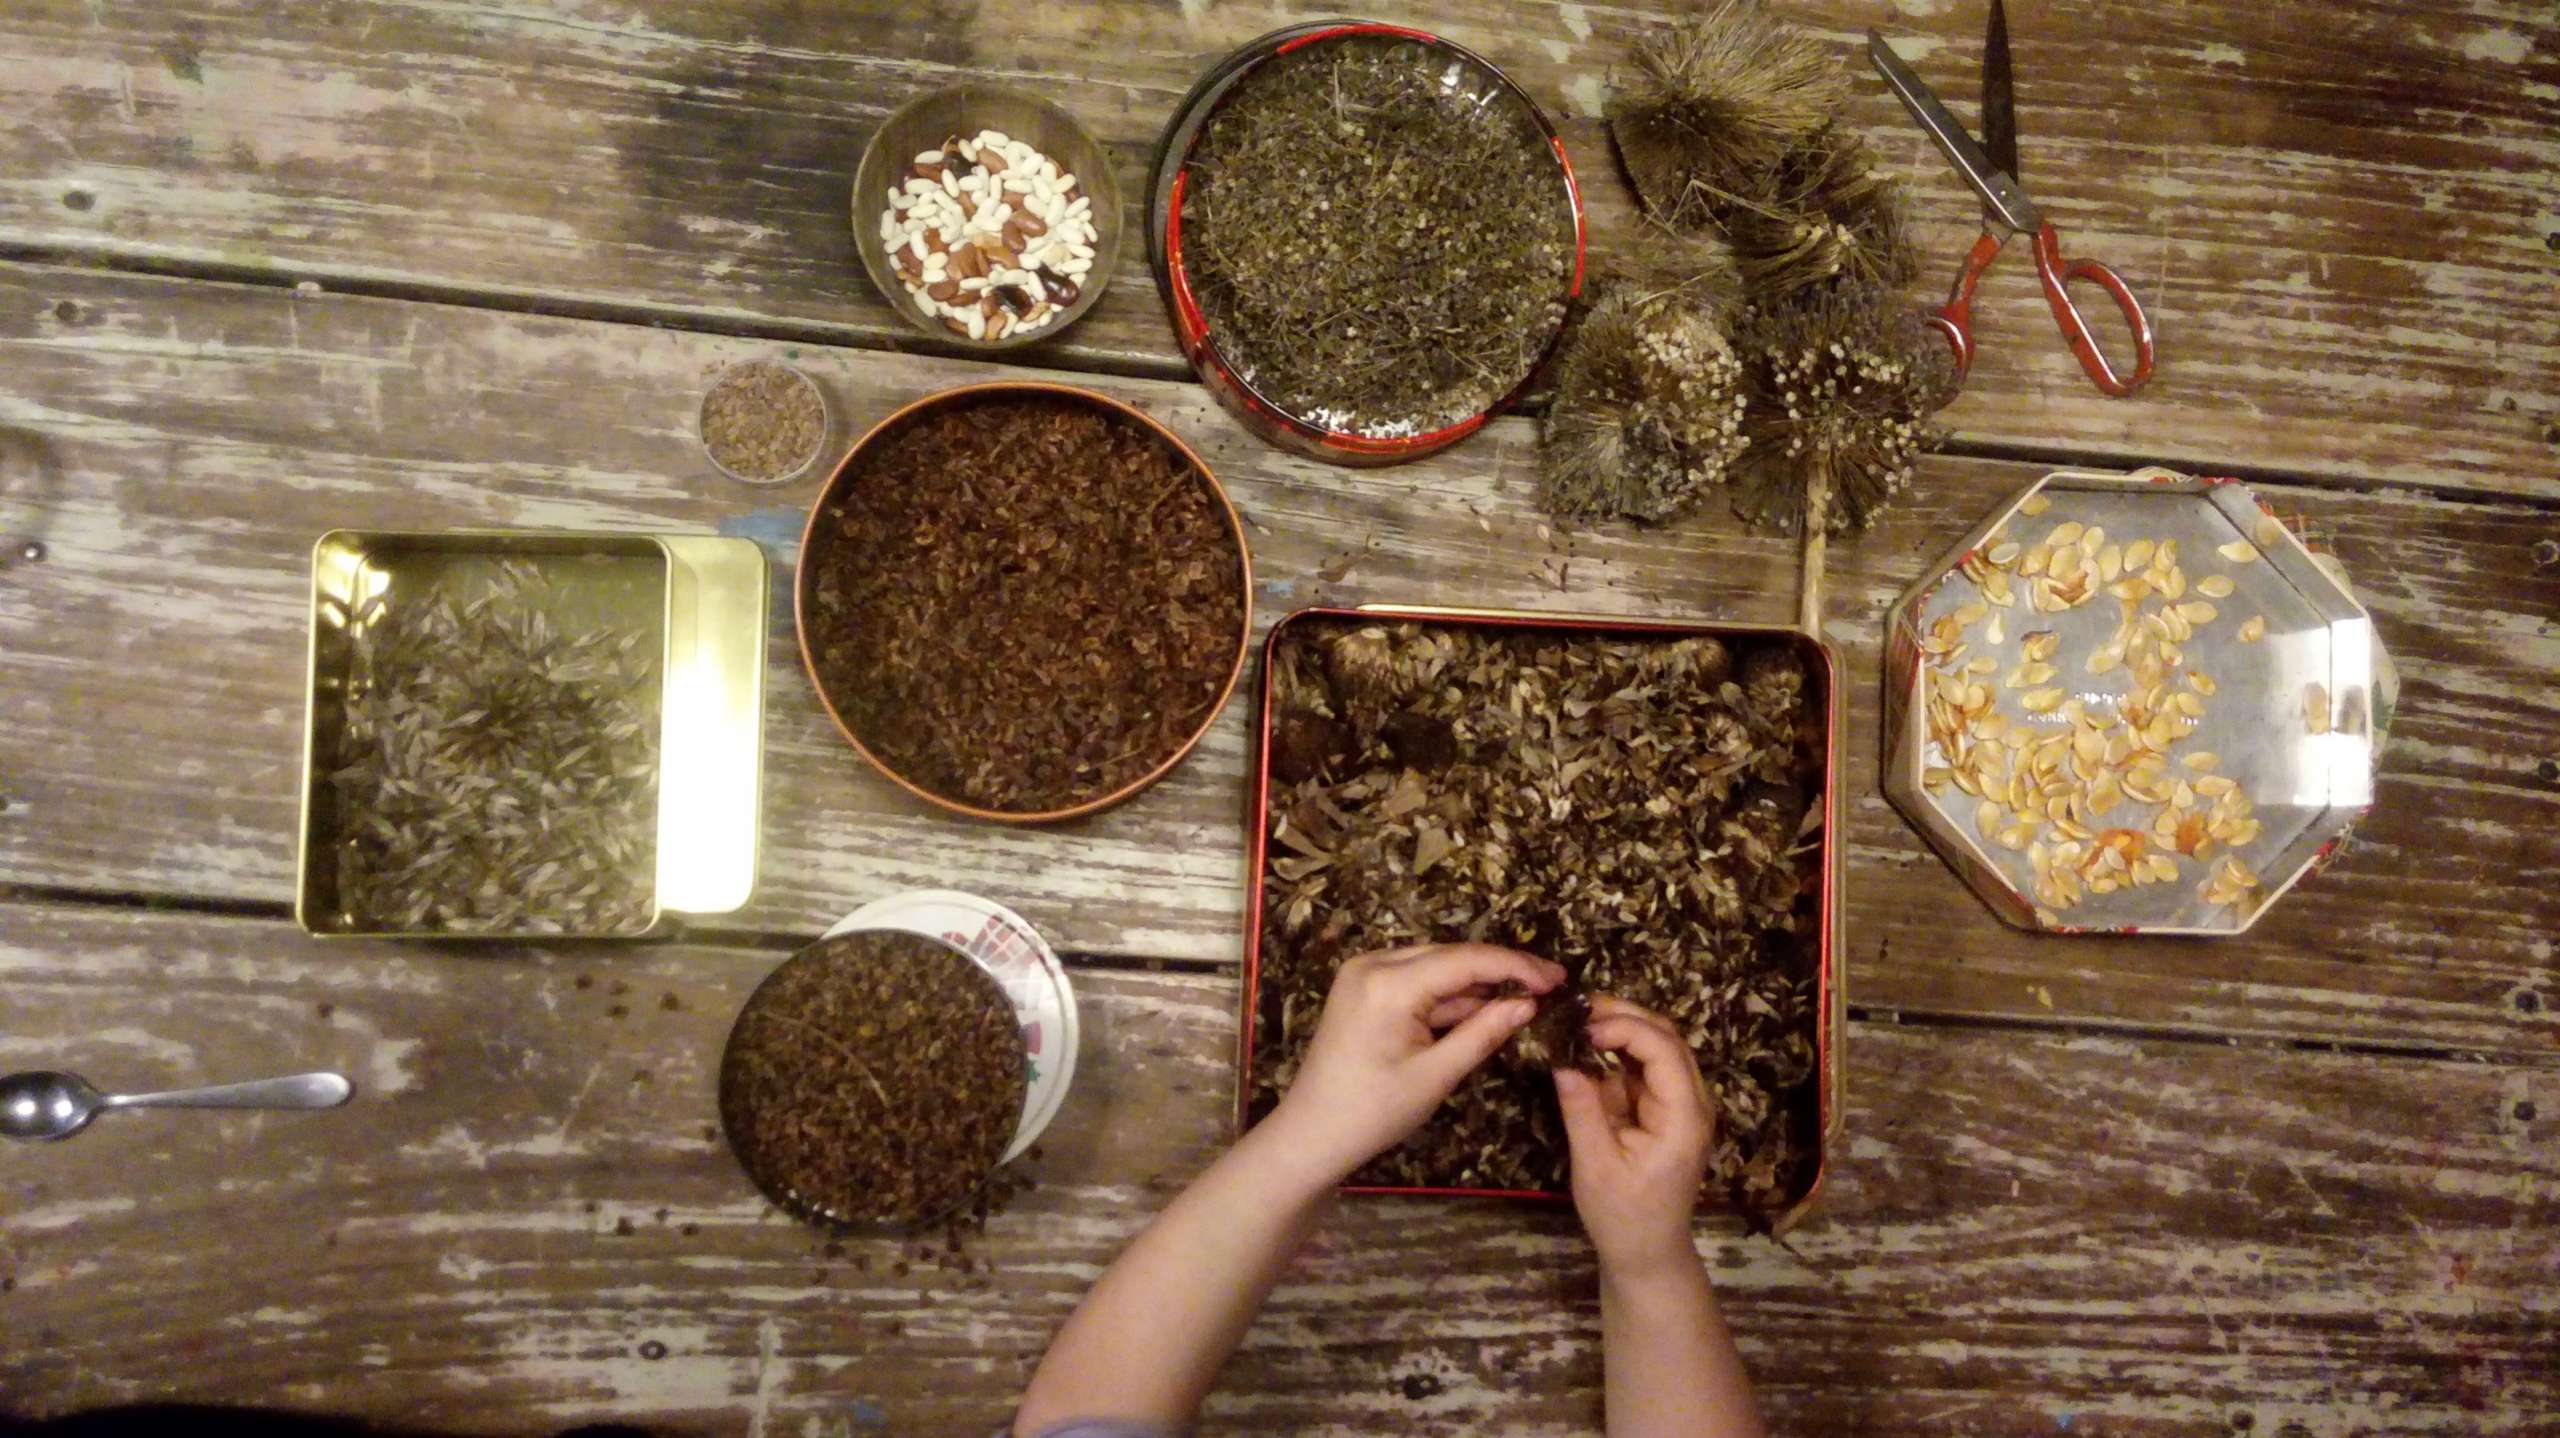
There’s much to be said for the food sovereignty of those with skills for saving their own seed. It’s a ritual we take seriously and it’s something we marvel at every season. That such a simple act can ensure food for my family yet it’s not a skill held in esteem and taught to all.
The first seeds ready at Black Barn Farm are the Alexanders, a perennial herb related to celery that is much like parsley), beetroot, spring onions garlic and rhubarb. Regardless of what you grow they all make their way to seed heads so there’s a few key things to remember.
- seeds need to be fully formed before being pulled from the plant.
- If you want non hybrid seeds, you need to either separate the varieties so they cannot cross pollinate or you need to cover your plants during pollination (you can use fine mesh bags or even paper bags.
- Its easiest to dry the seeds when still on their plant frame so wait until they are dry and hang them as a bunch
- The seeds need to be stored in a cool, dry place
- Each container needs to be marked clearly with ‘variety’, when harvested, where harvested from
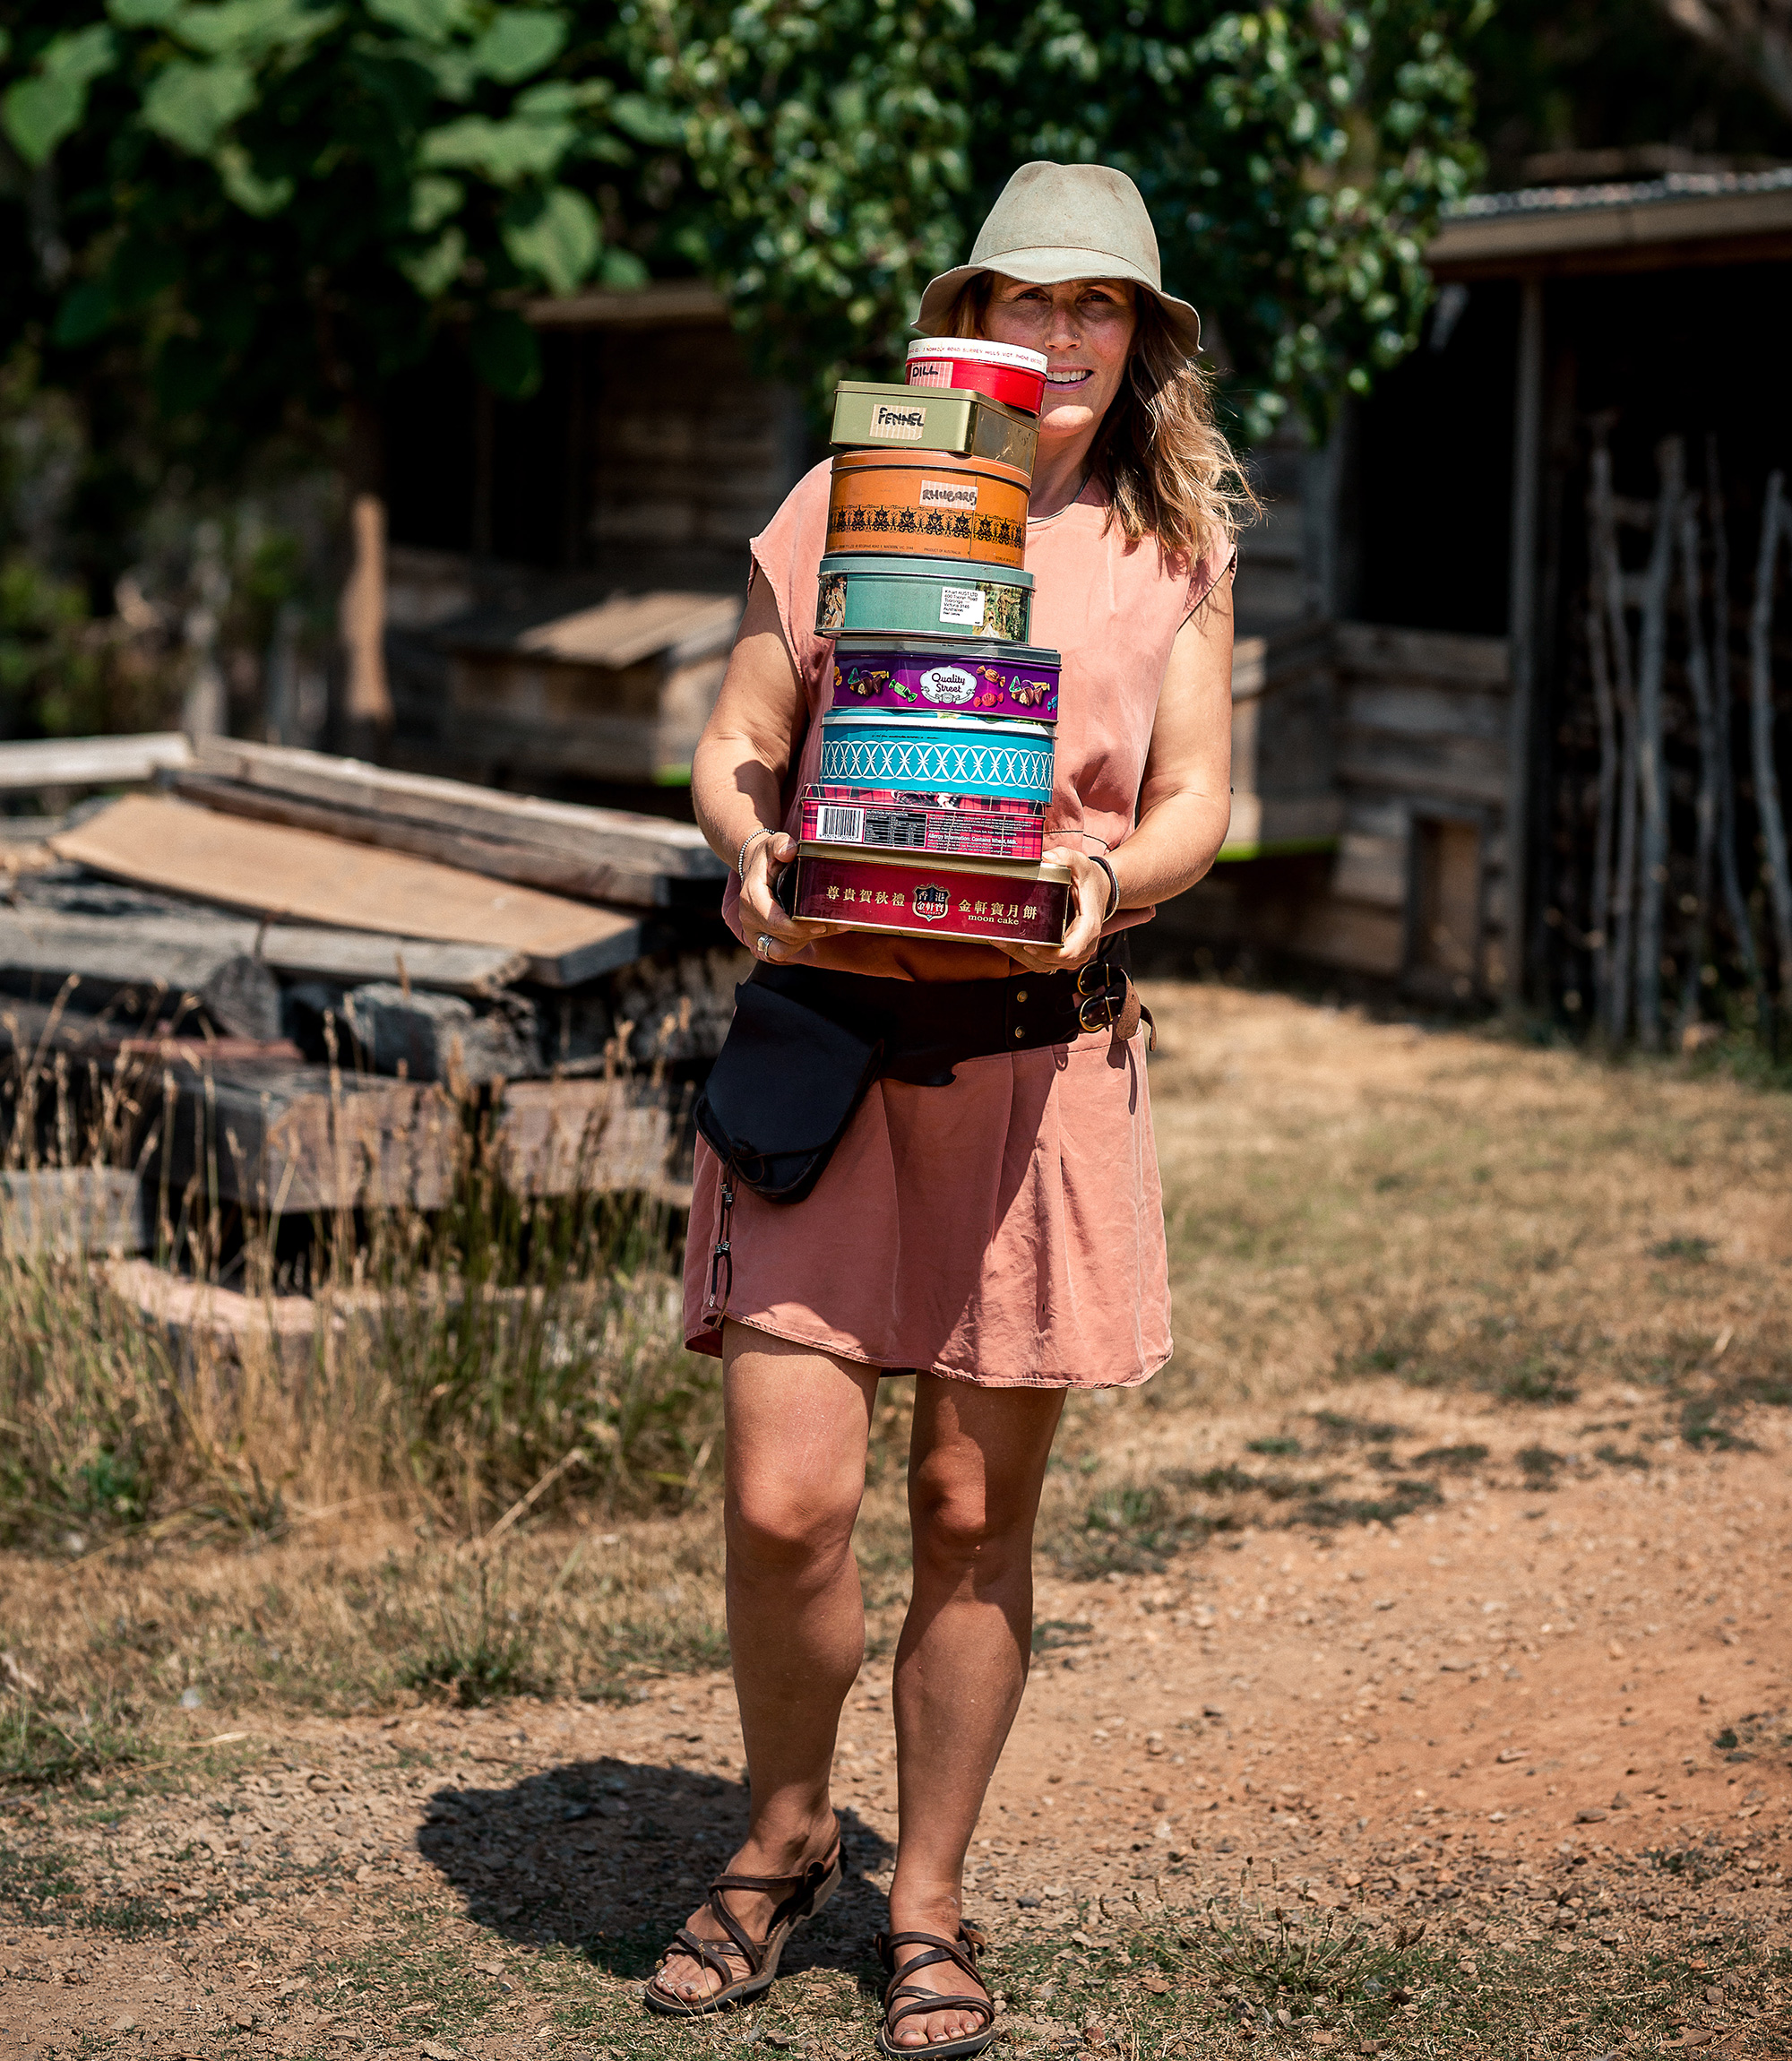
We use old biscuit tins for our seeds. They are water proof, airtight, dark and stack easily, perfect for storing seeds and already sitting in our shed having been collected in op shops and saved from presents over the years.
Golden Rules of Seed Saving
- LOW HUMIDITY. The most important thing with seed saving is humidity, never exceed 5% so never fridge them. Just store in an airtight container.
- Temperature – not too hot or cold, minimise fluctuations. Between 5 and 15 degrees is ideal
- Labelling – Make it clear from the start.
- Age – the fresher the seed the higher the germination but some seeds have a long life span – see table below.
- Share unused seeds with your local food co op, gardening group or start a seed saving library to share with your community.
How long will my seed last?
Inevitably even big veggie gardens run out of growing space every year leaving you with a seed excess. Many will last much longer than one season and if you don’t have any way to share with others then store them well and save yourself the trouble of saving next year.
Vegetable and years the seed will keep and still be viable
Asparagus – 3
Bean – 3
Beetroot – 4
Broccoli – 3
Brussels Sprouts – 4
Cabbage – 4
Carrot – 3
Celeriac – 3
Cauliflower – 4
Celery – 3
Chard, Swiss – 4
Chicory – 4
Chinese Cabbage – 3
Collards – 5
Corn, Sweet – 2
Cucumber – 5
Eggplant – 4
Endive – 5
Fennel – 4
Kale – 4
Kohlrabi – 3
Leek – 2
Lettuce – 6
Melon and cantaloupe – 5
Mustard – 4
Okra – 2
Onion – 1
Parsley – 1
Parsnip – 1
Pea – 3
Pepper – 2
Pumpkin – 4
Radish – 5
Spinach – 3
Squash – 4
Tomato – 4
Turnip – 4
Watermelon – 4

RITUAL: Damper Delight
In the back of my Dads old yellow art van he kept a ‘damper box’. As its name suggests, it contained everything you’d ever need to whip up a damper over an open fire at the drop of a hat – even the bottle of beer to add that extra yeastiness.
On more occasions than I can name, he’d whip the box out and weave his magic. Square boxy hands that told of his practical capabilities would mix it all together (with the obligatory swig of beer for the chef) before throwing it amongst the hot coals. We waited! Until finally the charred remains would be dusted off and cracked apart to reveal the soft, fluffy innards ready to be drowned in butter and Jam.
Our fingers, faces and clothes got charry and sticky but it was a pure delight that still tickles the fancy of the next generation.
Anyone can make it, theres little skill in that. But the existence of the box in the first place where everything sits in waiting is the genius that allows the ritual to become reality.
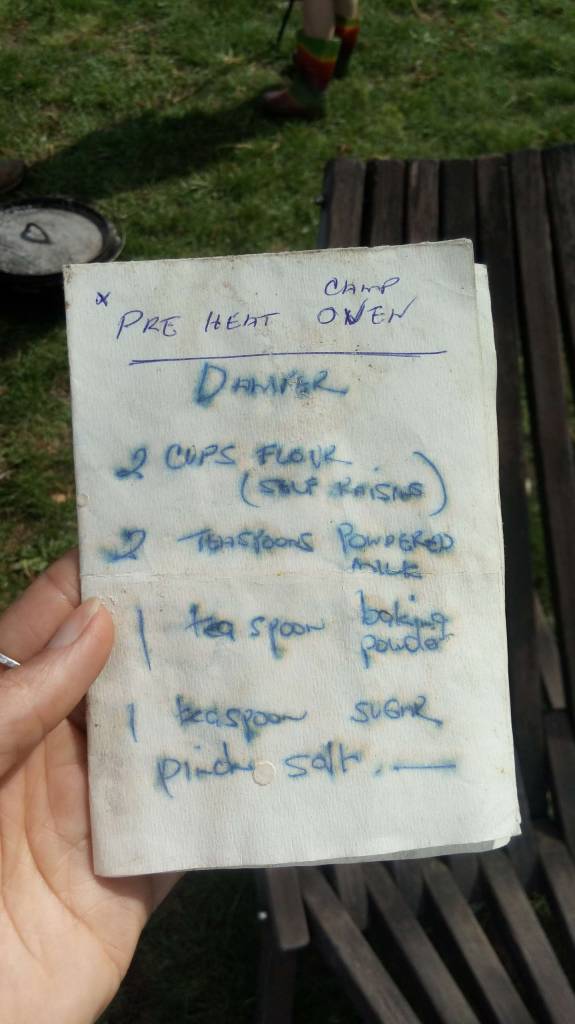
If you fancy adding damper to your autumnal ritual, try Dads recipe here to create your own box:
Makes one loaf
– 2 cups self raising flour
– 2 tsp powdered milk
– 1tsp baking powder
– Pinch salt
– Can of beer (you won’t need it all)
1. Pre heat your camp oven in a hot-coal-fire
2. Mix all the dry ingredients into your tub and mix it well
3. Add beer slowly and mix with fingertips until blended and dough like – not too sticky.
4. Mould it into a mounded shape and place into a pre floured, pre heated camp oven
5. Nestle the oven back into the coals and add hot ash to the top of the oven as well
6. Bake for approximately 25 minutes before checking.
7. Serve with slabs of butter and spoons of jam.

NOURISH: Fill Up On Outside Places
Did you know that ‘nature deficit disorder’ is a thing, hard to imagine but yep, it is! With autumnal days of sensorial overload offered at scale and the impending winter closing in, grasp the turning with gusto and spend your days side stepping the apathy of such a disorder by reinventing your childlike curiosity for the great outdoors.
Each of us arrives earthside with an intrinsic wonder of the natural world. Our senses are teased by pure sensations; wind on our face, dappled light through the trees, the feeling of sand in our hands or stones under our toes and the assaulting colour of Autumn leaves. Early childhood is filled with trees to be climbed, mud pies to be baked and autumn leaves to pile into….the joy is real, the appreciation is unaffected and the connection is formative. Sadly, for many, this joyful connection descends from early adulthood bringing with it an unnatural disconnection to something we actually need and replacing it with sterile, curted, controlled environments which disrupt our ‘knowing’.
Be nourished this season by re-igniting your childlike wonder with outside places. Remove expectation and time frames and give over to our instinctive attraction of interacting and observing without purpose. Seek wild places lacking in symmetry and order and say hello to the real world rich in diversity, natural patterns and biodiversity, develop a trust in the wilder side and listen to your body as it grows in confidence with life out-of-doors. Outside is free and when in it we can be wild – you’ll see
Get your dose by:
Picnics in the afternoon sun
Fill bowls with Autumn leaves
Build an outdoor fire bath and soak under the stars
Set the table with collections found on your wander
Soak foraged leaves in boiling water and steam your face
Shift your lens to see wildpaces as abundant and diverse not messy and uncontrolled
Whittle without purpose, let it be more about the foraging, finding and repetitive rhythm
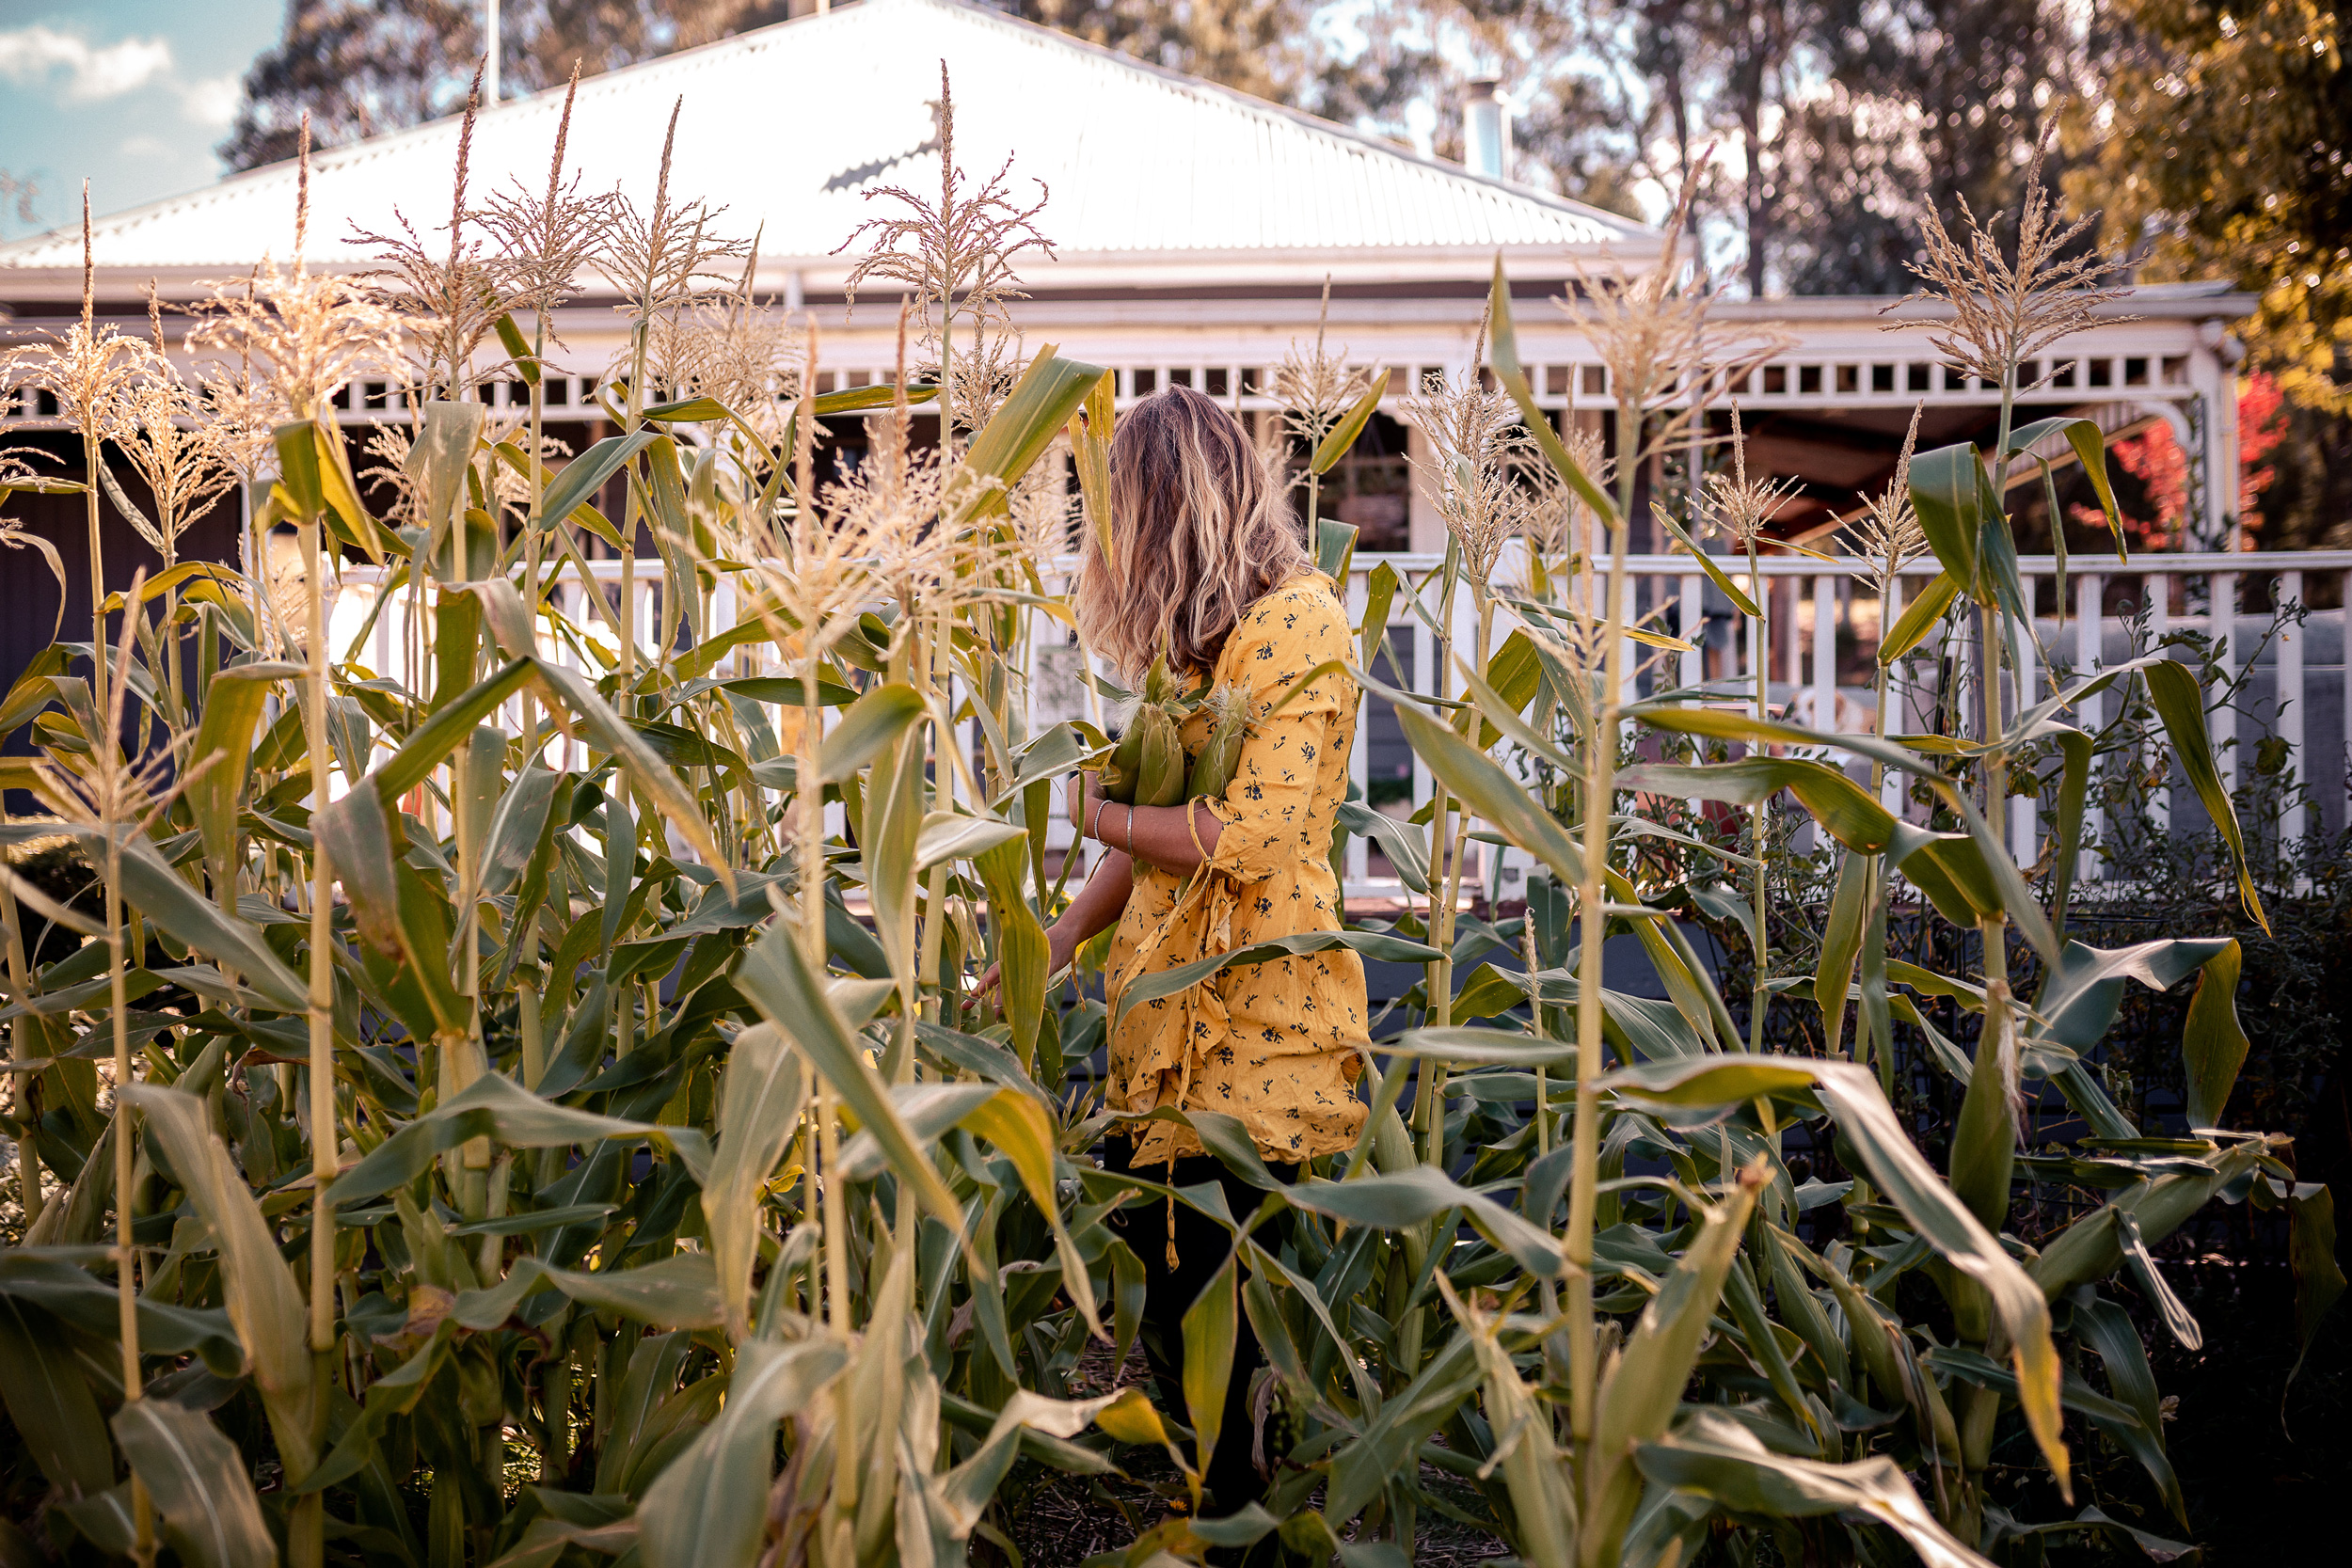
GROW: Corn
Introduction
In our house we play this game where we each decide what to take to a desert island forever. But we have rules. One of those rules is that you can only take 3 foods (tough choice huh). Amazingly, 3 of 5 in my family include corn on their list. It’s heavily debated around the campfire but the argument for corn is strong, it’s sweet, juicy, flavoursome, versatile, easy to grow, varietally abundant, nutrient dense and filling. What more could you want on a desert island!
For all these reasons, corn is simply a must have in the backyard patch as much as it’s a powerhouse in the global food production process.
In 1903 there were 307 varieties of corn available commercially but by 1983 there were only 12.
Many of the heirloom varieties of sweet and popping corn have been meticulously bred and shared by grass roots community groups but there are also now an increasing number of small seed companies making a wide variety of heirloom seed available.
We’ve long experimented with corn as it’s a fresh mainstay during Summer and we grow big quantities for our Winter stores too.
Growing It
While easily grown, regardless of variety they all share some base requirements: Sun, heat, water and nutrient rich, well composted soil. You really can’t scrimp on these growing conditions or you simply won’t get the full cobbed, sweet harvest you hope for.
Cool regions: late October – November
Temperate areas: September – as late as January but you need 16 weeks of warmth to reach maturity.
Warm regions: September – October, unless you are tropical as you can plant any time other than December
As with many annuals, corn is hungry so make sure your soil is nutrient dense before you plant. Fill your beds with fresh compost or well aged manure (cow or horse is preferable as it’s not as nitrogen rich so won’t burn the plant if it’s a little ‘hot’). It’s also a perfect green manure crop follower as it uses the nutrients from the rotting leaf matter immediately.
Sow seeds directly once the soil is warm enough (ideally 20 degrees). Protect seedlings from pests by tipping a glass jar over them. When they fill the jar, let them loose. Once they reach about 30cms, ‘heel up’ the soil and mulch with pea straw so they are strong and well fed. They appreciate regular compost teas too.
Plant in blocks rather than rows, this helps with pollination and wind protection. Aim for a minimum of 8 x 8 plants 40 cms apart in your block and create multiples of this for succession planting. Corn takes between 60 and 100 days from seed to harvest depending on variety. Variety also dictates the size and quantity of ears per stem.
When To Pick?
The secret is in the silks. Once they brown right off, check the kernels inside. Gently peel back the husk and pin the cob with your fingernail, a ‘milky’ not ‘watery’ liquid confirms you’re good to go.
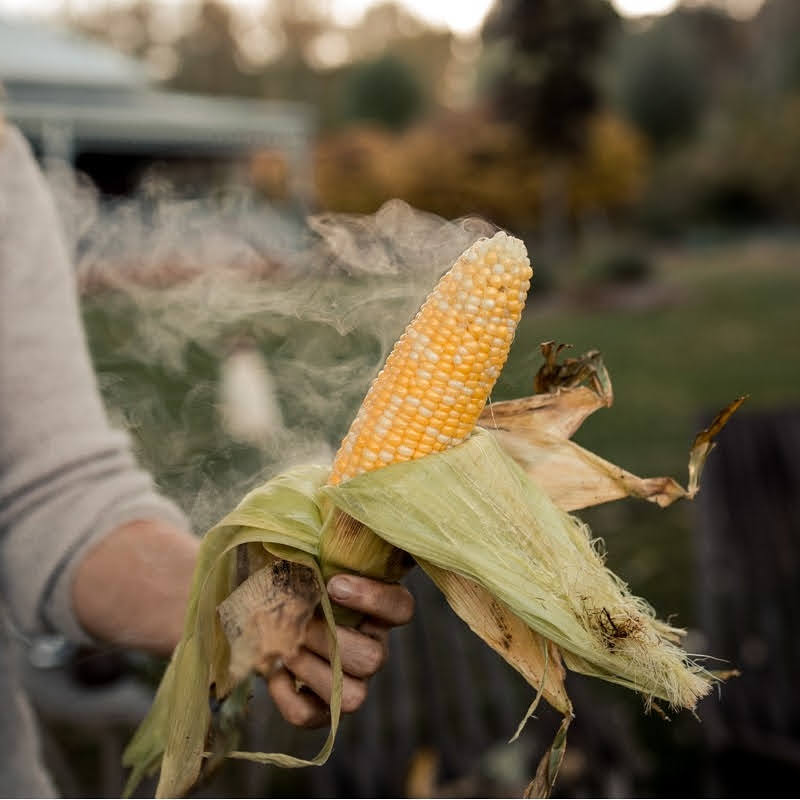
Cooking
Theres nothing as alluring as a cob left in its husk to steam away absorbing the smokey flavours over a campfire before being drowned in butter and salt as a succulent treat. Picked fresh, cooked immediately, eaten hot and all without plates or waste as the husk is the handle before going straight to the chickens or compost.
Corn loses quality quickly once picked so is best eaten fresh. It will maintain quality on the stem for multiple weeks but if you have a glut, try storing it for winter, simply pick, de-cob, blanch for 30 seconds and bag up before freezing!